A split canvas painting + a bright idea!
I've been wanting to make another split canvas painting, but I wanted it to be something pretty cool. And I ended up coming up with this idea. It has a strand of mini lights that poke through the canvas to light it up! And actually, my strand had 2 settings, steady on, and flashing. The flashing would be perfect for the fireflies, except that they all flash together, so it doesn't look good. They need to be chasing lights or something.
I've been wanting to make another split canvas painting, but I wanted it to be something pretty cool. And I ended up coming up with this idea. It has a strand of mini lights that poke through the canvas to light it up! And actually, my strand had 2 settings, steady on, and flashing. The flashing would be perfect for the fireflies, except that they all flash together, so it doesn't look good. They need to be chasing lights or something.
And unfortunately, I'm by no means a great painter, so I didn't turn out quite as well as I had hoped, but considering how extremely difficult it is to paint a clear jar, I'm still pretty pleased with the results.
But basically this is a painting of a jar of fireflies that are being set free (in case you couldn't tell). The picture below shows it in regular lighting, dim lighting, and with no lighting. The thing that sets this painting apart from others is the lights, as you can see. If you want to see what I used and I how I made this, I have more pictures and details below. :)
(P.S. - did i mention that painting clear glass jars is SUPER HARD???)
You need some lights!! You could use mini christmad lights, or even regular christmas lights if you want, or if you're making a much bigger canvas than me. I used Tiny Lites. My sister gave them to me for Christmas, I think she got them from Michaels.
This is what the little bulbs look like if you're wondering. These are a battery operated pack that takes 4 AA battering. You'll see the battery pack in a photo further down. (Sorry its a little blurry, my camera wouldn't focus)
Anyway, next you need something sharp. Please get parental supervision if you feel it is necessary. I used a little hook that came with my Cricut tools. You could use an ice pick, maybe ever a screw driver, though it probably isn't sharp enough. Possibly some scissors would work. A nail. A pencil. Be creative, use whatever you have laying around.
****Make sure whatever you are using to poke your holes will not make a hole bigger than your lights. otherwise they will just fall right through!!!**** (My hook was just a little too small, so i had to make each hole a little bigger to get the light to pop through. But you want it to be a snug fit so the lights to wiggle around and fall out.)
This is my Cricut tool hook.
So, poke your holes, and make sure they aren't too far apart that your lights won't reach to each hole. That would be bad :/. Also, make sure you place one as close to edge as possible on each side so that when you hang it on the wall, you have plenty of wire to reach across the small gap between each canvas.
(Technically, this isn't a big deal, as you could just have a light bulb visible between the canvases, but I only had 20 bulbs on my strand and i didn't want to waste any. It's up to you.)
Once you poke your holes, pop the bulbs into place. Canvas is pretty tough, so don't be afraid to apply pressure to get the bulb in. Only widen the hole if you really really need too, otherwise it will be too big and your bulb with fall out or push too far through.
The back of your canvas will probably look like this.
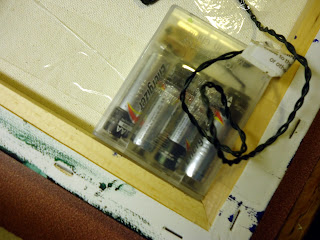
You should have your battery pack nestled in the outside corner of one of the outer canvases and taped securely into place like this. But also easily accessible to turn on or off or to change batteries if necessary.
(You could use a real strand of lights that plug into the wall, but then you will be limited on where you can hang your canvases, and it might look kinda tacky to have a strand of lights hanging down from it, unless you could hide it behind something.)
Next you want to tape the wire down so that when you hang up your canvases, it wont be sticking out and keep your canvas from lying flat against the wall. Also, if you have any loose fitting lights, this will help keep them in place and help prevent them from getting knocked out.
One last step that you could do if you want is to paint the wire that will be showing to match the color of your walls where you'll be hanging it, just to make it look a little nicer.
Oh yeah, and went back and used modpodge to add a little gold glitter to some of the fireflies without lights. And I'm thinking about going back with glow in the dark paint to add some to the others that don't have lights or glitter... we'll see.
But anyway, that's pretty much it!! Hope you like it and good luck if you decide to make a version of your own!! A night sky with stars would be pretty. Or even a christmas tree, lol. Be creative. :)


No comments:
Post a Comment